Table of Contents
ToggleA patio cover attached to your house transforms a bare slab into a functional outdoor room, one where you can sit during a light rain, entertain without squinting into the sun, or simply enjoy morning coffee without UV exposure. Whether you’re protecting furniture, creating year-round entertaining space, or increasing home value, the right patio cover idea depends on your climate, budget, and how much shade or shelter you actually need. This guide walks you through four proven styles, what materials work best, and what to ask yourself before breaking ground.
Key Takeaways
- Patio cover ideas attached to your house range from open pergolas to solid aluminum systems, each offering different levels of shade, weather protection, and maintenance requirements based on your climate and needs.
- Proper ledger board installation bolted directly to the house’s rim joist—not just the siding—is critical to prevent water damage and structural failure, regardless of which patio cover style you choose.
- Aluminum patio covers cost 2–3 times more than wood pergolas ($3,000–$6,000 installed vs. $800–$1,500) but provide zero-maintenance durability and real weather protection, making them ideal for humid or wet climates.
- Polycarbonate panel systems block 99% of harmful UV rays while allowing diffuse light through, creating a greenhouse-like effect perfect for covered outdoor kitchens and entertaining spaces.
- Building permits and structural engineer drawings are required in most jurisdictions for attached patio covers; post footings must extend below the frost line to prevent settling and cracking.
- Retractable awnings offer the most flexibility and lowest cost ($400–$2,500), but work best in moderate-wind climates and require annual fabric maintenance to prevent mold and fading.
Pergola-Style Covers: Open-Air Shade With Modern Appeal
A pergola attached to your house gives you partial shade through its slatted roof design. The gaps between the 2×6 or 2×8 lumber beams let filtered light and air circulation through, which many homeowners prefer over solid covers, especially in humid climates where air stagnation can be a problem.
Pergolas work best when sun angles are steep (summer afternoons) and less well when the sun is low (winter mornings or late afternoons). If you’re in a cold climate, the open design means rain and snow will fall through, so it’s not a full weather seal. But, you can add removable shade cloth, a retractable canopy, or climbing vines to upgrade coverage as needed.
Attaching a pergola to your house requires proper ledger board installation, a bolted connection using lag bolts or bolts with flashing to prevent water from running behind the house framing. Most building codes require the ledger to be attached to the house’s rim joist or band board, not just to siding. This is non-negotiable structural work: skipping it means the pergola can fail and damage your foundation. Most jurisdictions require a permit for attached structures.
Material choices range from pressure-treated lumber (budget-friendly but requires stain or paint every 3–5 years) to cedar or redwood (naturally rot-resistant but pricier) to maintenance-free composite or PVC beams. A 12×16 pergola using pressure-treated 2×8s runs roughly $800–$1,500 in materials: adding a ledger flashing kit, hardware, and concrete footings for posts adds another $200–$400.
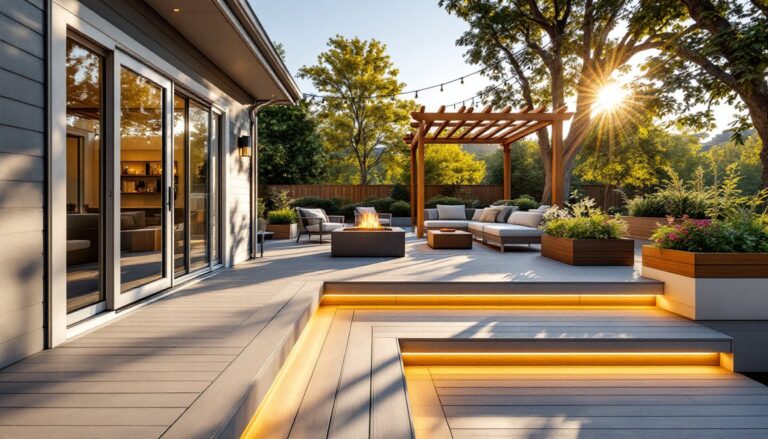
Aluminum Patio Covers: Durable, Low-Maintenance Attached Structures
Aluminum patio covers arrive as kit systems: pre-cut beams, posts, and rafters bolted together on-site. The big advantage is zero maintenance, no painting, staining, or wood rot. Aluminum doesn’t expand and contract like wood, so gaps and squeaks don’t develop over time.
These covers typically have a solid or semi-solid roof panel (polycarbonate or aluminum slats), giving you real weather protection rather than just dappled shade. A 12×16 aluminum cover with solid panels generally costs $3,000–$6,000 installed, depending on local labor rates and panel type. That’s 2–3 times the cost of a basic wood pergola, but the longevity offsets the upfront expense.
Aluminum does have limits. The material itself won’t rot, but condensation can build under solid roofs in humid climates, good drainage and ventilation matter. Also, aluminum conducts heat, so a dark-colored aluminum roof in full sun gets hot and transfers warmth into the space below. Light colors or insulated panels help. Quality matters: thinner-gauge aluminum will flex or dent: look for systems using 0.125-inch minimum thickness for main beams.
Installation still requires a bolted ledger connection to your house and proper footings for posts, typically a concrete pier buried below the frost line. In sandy or poorly draining soil, inadequate footings cause posts to settle and crack concrete. Most homeowners hire a contractor for aluminum systems rather than DIY, though capable builders can handle it with a helper.
Retractable Awnings: Flexible Shade You Can Control
A retractable awning mounted to your house fascia or soffit gives you shade on demand. Crank it out when you need it, roll it in when you don’t. This flexibility appeals to homeowners who want seasonal control or who live in climates with unpredictable weather.
Manual retractable awnings (hand-crank) cost $400–$800 for a 12-foot width. Motorized versions with a remote or wall switch run $1,200–$2,500. Both need secure mounting into solid framing, the fascia board or a bolted aluminum bracket attached to your rim joist or house band board. Improper mounting causes the awning to sag or, worse, tear away under wind load.
Retractable awnings work best in moderate-wind climates. Strong winds can damage the fabric and mechanisms, so most manufacturers recommend retracting the awning if sustained winds exceed 20–25 mph. The fabric (usually acrylic) blocks 80–95% of UV and lasts 5–8 years before fading or needing replacement: annual cleaning extends life. In wet climates, mold can grow on stored fabric, so airflow and occasional sunning are important.
These awnings don’t provide the same visual impact or structure as a permanent cover, but they’re the easiest DIY option if you’re confident with fasteners and ledger work. Many come with detailed mounting hardware and instructions. The tradeoff is that you’re adding a moving part that requires seasonal maintenance and occasional adjustment.
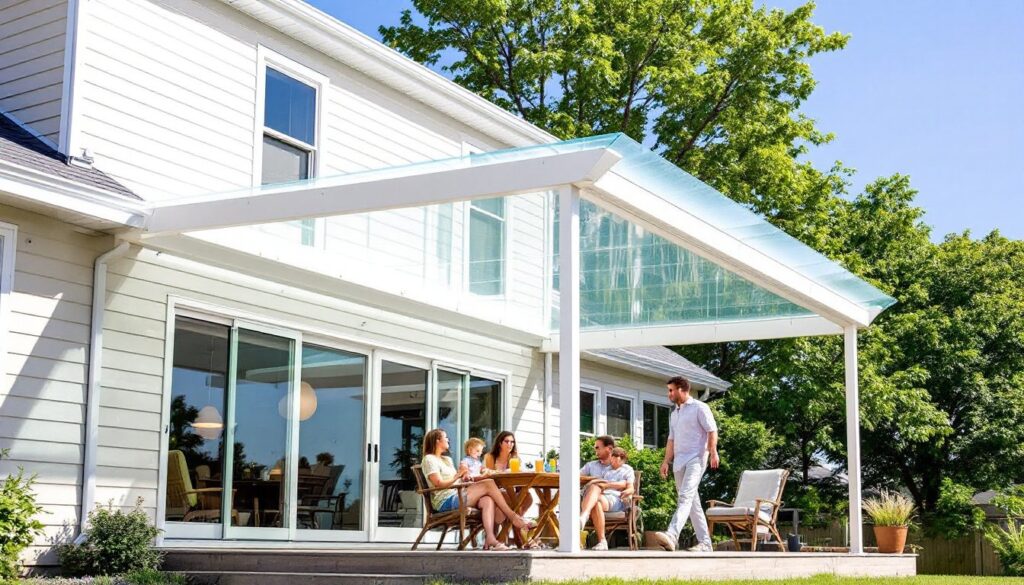
Polycarbonate Panel Systems: Weather Protection That Lets Light Through
Polycarbonate panels (like Plexiglas®) are transparent or translucent plastic sheets, usually 6mm or 10mm multiwall thickness for durability and insulation. Mounted on an aluminum or wood frame, they block rain and UV while letting diffuse light through. You get a greenhouse-like effect: warmth and light without harsh glare.
A key advantage is that polycarbonate panels block 99% of harmful UV rays, protecting both your skin and outdoor furniture from fading. The 10mm multiwall thickness also provides better insulation and sound dampening than thinner sheets, making the space feel quieter and more sheltered. But, the translucency can make the space feel exposed, if privacy matters, you’ll need to add curtains or slatted screens alongside the panels.
Polycarbonate discolors slightly over 5–10 years in harsh sunlight, especially if lower-quality panels are used. Buy UV-stabilized, multiwall polycarbonate from a reputable supplier: bargain plastic yellows and becomes brittle quickly. A 12×16 polycarbonate patio cover kit costs $1,500–$2,800 in materials, with frame and fasteners included.
Installation resembles the aluminum cover process: ledger bolting, post footings, and frame assembly. You’ll also need to seal the polycarbonate edges and install end caps to prevent water from seeping into the hollow cores. Proper ventilation at the ridge and eaves prevents condensation buildup. Most DIYers tackle simpler systems, but professional installation ensures the warranty stays valid and the structure is code-compliant. Design professionals and outdoor entertaining experts often recommend polycarbonate for covered outdoor kitchens and high-traffic entertaining zones, as the transparent overhead creates an open, welcoming feel while protecting against weather.
Choosing the Right Materials and Design for Your Home
Before you choose a style, ask yourself three questions: How much shade do you actually need? Do you want rain protection or just sun protection? And how much maintenance are you willing to do?
If you’re mostly avoiding UV and harsh midday sun, a pergola or retractable awning might be enough. If you need true weather coverage for dining or a seating area, aluminum or polycarbonate pays dividends. Think about your climate too. In Arizona or Southern California, a solid roof prevents the space from becoming an oven, while in the Pacific Northwest, ventilation matters more than insulation.
Material lifespan also drives choice. Pressure-treated wood requires staining or painting every 3–5 years, not a huge expense, but it’s a recurring task. Aluminum and polycarbonate kits need annual debris clearing and occasional fastener checks, but no finish work. Cedar or composite costs more upfront but lasts longer and looks better aging naturally.
Color and style should suit your house. A sleek aluminum cover pairs well with modern architecture: warm wood works better with traditional or craftsman homes. You can paint or stain wood to match your existing trim or siding, while aluminum comes in limited color options (though you can paint it). Discuss design with your contractor or designer, a poorly proportioned cover dominates your yard and looks mismatched to the house.
Finally, check local zoning and HOA rules. Some neighborhoods restrict cover size, material type, or height. A few require covers to match the house roof pitch or color. Getting details wrong means paying to tear it down and rebuild correctly.
Getting Started: Permits, Planning, and Next Steps
Most jurisdictions require a building permit for patio covers attached to the house, especially if they’re over a certain size (often 150–200 square feet). A permit isn’t red tape: it ensures the structure meets local building codes, which protect you from foundation damage, roof collapse, or liability if someone gets hurt.
Before pulling a permit, you’ll need plans showing the ledger detail, post footings, lateral bracing, and snow/wind load calculations. Your local building department can tell you the required snow load (varies by region: look it up in the International Residential Code, IRC) and required wind speed design. A simple DIY sketch might not meet the requirement: the building department may ask for stamped structural drawings from an engineer ($300–$800). This cost surprises many homeowners, but it’s non-negotiable in most jurisdictions.
Once you have a permit, follow the building process step by step. Proper ledger installation is the biggest safety concern, water damage to the house costs far more than getting the flashing right the first time. Use bolts or lag bolts spaced 16 inches apart, with metal flashing that extends 2 inches up the rim board and 2 inches down over the siding. Caulk the flashing with exterior-grade polyurethane sealant (not silicone) and check for leaks after the first heavy rain.
Post footings must go below the local frost line, check with your building department for the depth (it ranges from 12 inches in mild climates to 48 inches in cold areas). Inadequate footings cause settling and cracking, especially in freeze-thaw cycles. Dig a hole at least 12 inches wider than the post, fill it with gravel for drainage, set a concrete pier or footer, and secure the post with bolts and a post base.
Take your time with measurement and layout. Use a string line and level to ensure posts are vertical, and double-check distances before pouring concrete. Most failures come from rushing this part. If you’re unsure, hire a contractor, it’s one of those tasks where a second set of experienced eyes saves headaches. Building codes exist because people got hurt or lost homes: respecting them protects your investment and your family.
Conclusion
A well-designed patio cover turns an unused outdoor slab into a livable extension of your home. Whether you choose a pergola, aluminum system, retractable awning, or polycarbonate panels depends on your climate, maintenance tolerance, and how much shelter you need. Start by getting a permit, reviewing local codes, and honestly assessing your building skill. Proper ledger installation and footings matter more than material choice, skip those, and no cover will last. Take time planning, invest in quality materials, and you’ll enjoy the space for decades.