Table of Contents
TogglePatio steps are often the forgotten detail in outdoor design, they’re functional, sure, but they’re also prime real estate for expressing your home’s personality. Whether you’re connecting a raised deck to a lower yard, creating an elegant entrance to a seating area, or simply bridging a grade change, the right steps can completely transform how your outdoor space feels and functions. From sleek floating designs to warm natural stone, there are plenty of creative approaches that go far beyond standard concrete stairs. This guide walks you through seven distinct patio steps ideas that combine aesthetics, durability, and practical construction considerations so you can choose, or build, the right solution for your home.
Key Takeaways
- Patio steps ideas range from modern floating designs to timeless natural stone, each offering distinct aesthetic and functional benefits for your outdoor space.
- Floating steps require proper engineering and structural support with cantilever treads anchored to steel beams or ledgers, making them ideal for contemporary aesthetics but demanding precision installation.
- Natural stone steps like bluestone and granite provide durability and character but require a solid foundation, regular sealing, and consistent riser heights (6–8 inches) to ensure safety.
- Composite and recycled material steps offer low-maintenance, eco-friendly alternatives with 20–30 year warranties, though they require stainless steel fasteners to prevent discoloration.
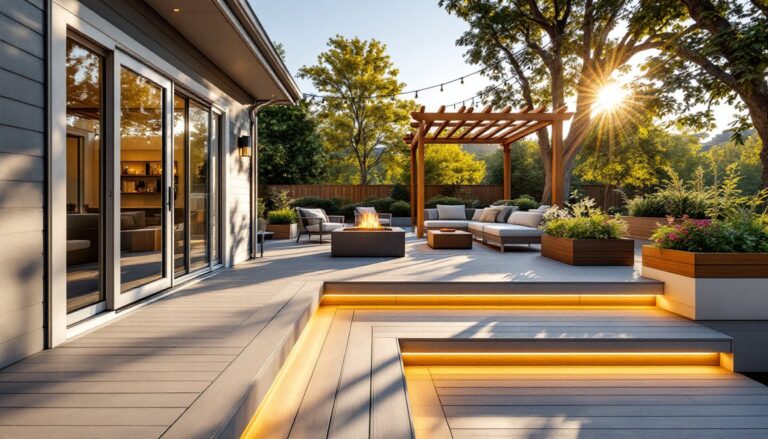
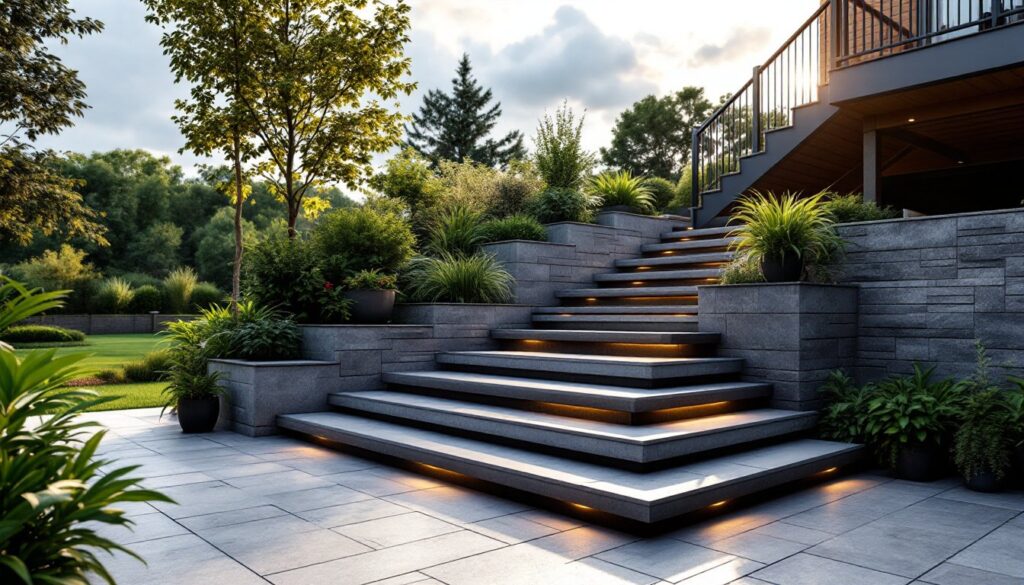
- LED illuminated steps enhance both safety and ambiance using low-voltage systems for easy DIY installation, while curved or tiered designs add visual interest and improve accessibility.
- Budget-conscious homeowners can build straightforward pressure-treated lumber steps for under $200 using simple stringers and exterior-grade fasteners, with proper measurements and sealing ensuring longevity.
Floating Steps: Modern Minimalism Meets Functionality
Floating steps create an illusion of weightlessness by cantilevering treads from a support structure hidden beneath or to the side. They deliver clean lines and a contemporary look that photographs beautifully and makes small outdoor spaces feel less cluttered.
Structurally, each tread is anchored to a steel beam, stringers, or ledger bolted into a solid foundation. The treads themselves, typically composite, hardwood, or steel, extend beyond their support point without visible brackets underneath. This cantilever design means you’re relying entirely on the connection’s strength, so proper engineering is non-negotiable here. Building code requires load calculations, and many jurisdictions demand stamped engineer drawings for any stepped structure over 30 inches high.
Materials range from pressure-treated composite decking (low maintenance, ~$3–8 per linear foot) to ipe or cumaru hardwood ($8–15 per linear foot) for a warmer aesthetic. Stainless steel can serve as treads for a truly industrial look, though it requires slip-resistant coating in wet climates. Installation demands precision: treads must be level, fasteners must be grade-rated for outdoor use, and the ledger bolts anchoring the support beam need to hit structural framing or a properly reinforced foundation.
Floating steps work best when you have at least 3–4 risers to justify the effort and expense. Single-step solutions lose the design drama. Maintenance is straightforward if you use composite or steel, but hardwood requires annual sealing or staining to prevent weathering.
Natural Stone Steps: Timeless Elegance and Durability
Natural stone steps, whether limestone, bluestone, granite, or slate, project permanence and craft that newer materials struggle to match. Each step is one-of-a-kind, and the surfaces develop a rich patina over decades that synthetic materials can’t replicate.
Bluestone is the go-to choice for many DIYers because it’s readily available, workable, and affordable compared to granite. A typical 12-inch-wide, 4-foot-long bluestone step (1.5 inches thick) runs $60–120 delivered. Granite costs 2–3 times more but offers superior hardness and slip resistance when honed or flamed. Slate is beautiful but delamination is a real risk in freeze-thaw climates: save it for mild regions.
Installation requires a solid base: excavate 4–6 inches, compact the soil, and add 2–4 inches of compacted gravel plus a 1-inch sand bed for leveling. Each step must sit fully supported: any overhang risks cracking. Dry-stack construction (mortarless) works for informal gardens but mortared steps are more stable. Use a strong outdoor mortar (Type S or N rated for stone), apply a 1-inch bed, and butter the back face. For exterior steps, 12-inch treads and 6- to 8-inch risers are ideal: anything steeper feels dangerous.
Do not skip sealing. Apply a penetrating sealer annually, especially on porous stone like limestone or slate, to prevent moss, staining, and moisture damage. In icy climates, seal after the first frost to prevent water from freezing inside the stone. Safety is critical: uneven surfaces and natural texture are features, but treads must be relatively level and have consistent riser height, even a 1-inch difference between steps creates a tripping hazard.
Composite and Recycled Material Steps: Eco-Friendly Options
Composite steps, made from wood fibers and plastic polymers, offer a middle ground between the low maintenance of stone and the warmth of wood. Brands like Trex, Azek, and TimberTech produce steps specifically designed for outdoor use, with UV inhibitors and mold resistance built in.
Composite treads cost $40–90 per linear foot installed, compared to $20–30 for pressure-treated lumber or $8–15 for bluestone. The trade-off: composite doesn’t require staining or sealing, resists insects and rot, and comes with 20–30 year warranties. But, composite does expand and contract with temperature, so fasteners can loosen, and it can feel plastic-y in certain light (though modern colors are much improved). Installation is identical to wood: stringers, fasteners, and proper drainage underneath.
Recycled material steps go further: recycled plastic lumber contains 80–100% post-consumer or post-industrial waste, often sourced from milk jugs or bags. These are durable but heavier than virgin composite and carry a green marketing angle many homeowners appreciate. A hardscaping guide on entry stairways emphasizes material selection based on both performance and environmental impact.
For either composite or recycled material, ensure your stringers are engineered for the load. Composite is denser than wood and heavier: underestimating support can lead to sagging or failure. Fasteners should be stainless steel or composite-specific to avoid corrosion and staining. Avoid pressure-treated lumber stringers if using composite treads, tannins can bleed and discolor the deck surface over time.
Illuminated Steps: Safety and Ambiance Combined
LED step lights transform safety into ambiance. A recessed light in each riser or a small fixture at the tread edge illuminates the edge of each step, making evening navigation safer while creating an inviting glow that extends your outdoor living hours.
Low-voltage LED fixtures (12V or 24V) are safest and easiest for DIY installation, no permit needed, minimal shock risk, and simple wiring. A basic set runs $50–200 depending on fixture quality and count. Solar-powered riser lights avoid wiring entirely but depend on sun exposure: they’re weaker than plug-in versions but work for subtle accent lighting. Hard-wired line-voltage (120V) fixtures offer brighter output but require a licensed electrician, a weatherproof junction box, a dedicated circuit, and a GFCI outlet.
For a DIY approach, use low-voltage LED strips adhered to the underside of each tread or fitted into aluminum channels recessed into the riser. Wiring runs from fixtures to a transformer (120V to 12V) plugged into a nearby outlet, or you source a solar charger if the area gets decent afternoon sun. Test winter performance if you’re in a cold climate, cheap solar panels lose efficiency below 40°F.
Placement matters: lights along the riser edge are better for defining step boundaries than lights on the side. Avoid shining directly upward, which creates glare and shadows. A regional design guide like Sunset often features outdoor lighting examples that balance aesthetics with function in various climates. Ensure all outdoor electrical connections are protected by a GFCI (ground-fault circuit interrupter) breaker to prevent shock hazards.
Curved and Tiered Designs: Adding Visual Interest
Straight steps are functional, but curved or tiered steps draw the eye and make your entry feel intentional and designed. A curved flight wraps around a landscape feature (a tree, a planting bed) and feels organic, while tiered platforms break the descent into smaller landings that are less steep and more inviting.
Curved steps demand more precision in layout. Each tread is slightly different in depth on one side than the other (a wedge shape viewed from above). If using stringers, you’ll need curved stringers custom-built or rented from a specialty supplier. Alternatively, individual treads can be cantilevered from an interior pole or support structure, which simplifies fabrication but is more expensive. Stone or composite steps work better for curves than framing lumber, since lumber becomes difficult to cut and connect at varying angles.
Tiered designs, often two or three large platforms separated by a few risers, feel generous and reduce the psychological commitment to a steep flight. They’re safer for elderly visitors and more accessible. A 4-foot-wide landing between flights of steps is standard: anything narrower feels cramped. Build tiered steps using the same methods as straightforward flights but plan for twice the horizontal run.
Both curved and tiered designs benefit from anchoring landscape plantings around them. The curves feel less arbitrary when framed by plantings, and tiered platforms become natural spots for pots or seating. Irrigation and drainage matter more with these designs since they interrupt water flow: ensure grading directs runoff away from structural elements and prevents pooling on platforms.
Budget-Friendly DIY Patio Steps: Building Your Own
If you’re comfortable with a level, a drill, and basic carpentry, you can build straightforward steps from pressure-treated lumber for under $200 (materials only, for a 4-step stair).
Start with stringers, the angled supports that hold the treads. Measure the vertical rise (from base to top) and horizontal run, then calculate tread depth and riser height using standard ratios: riser height typically 6–8 inches, tread depth (run) 10–12 inches. A popular formula: (2 × riser) + tread = 24–26 inches. Once you’ve calculated, mark the stringer using a framing square, cut using a circular saw, and build two or three stringers depending on width.
Buy 2×12 pressure-treated lumber for treads (nominal 2×12 is actually 1.5 × 11.25 inches). Cut them to length, sand edges smooth, and attach with galvanized screws (not nails, they pop out). Fasteners matter: use exterior-grade fasteners rated for pressure-treated lumber: cheap hardware rusts and fails. Set stringers on a solid footing, concrete pads, a ledger bolted to the house rim beam, or footings below frost line if in a freeze-thaw zone. No cantilevering without engineering.
For a full walkthrough with diagrams and tool lists, Instructables offers step-by-step DIY guides that cover stair building in detail. Do not scrimp on measurement and layout, most failures come from inaccurate calculations early on. A 1-inch variation in riser height across the flight creates a tripping hazard. Seal pressure-treated steps annually: the wood grays without protection but isn’t unsafe, though a coat of exterior stain looks much better and lasts 3–5 years. This approach works for 3–5 steps: anything taller warrants a professional or a second pair of hands for safety and accuracy.
Conclusion
Patio steps are more than a functional transition, they’re a design signature that can define your home’s outdoor character. Whether you go modern with floating treads, timeless with natural stone, or practical with a DIY build, the key is matching materials and design to both your climate and your skill level. Invest time in site prep, measurement, and proper fastening: those details determine whether your steps last a decade or two. And if a project feels beyond your comfort zone, a licensed contractor or mason is money well spent for structural integrity and long-term peace of mind.